Lesson 4: Organizing the Bookmarks View
The Bookmarks View allows you to choose the "must see" topics for this WebCD. The
bookmarks you create pop-up in a small Bookmarks or Table of Contents window.
Simply double-clicking a bookmark immediately displays
the referenced page in the user's browser.
You can customize the Bookmarks specifically for the audience of this WebCD--be it
customers when sending out a knowledge base or technical tips CD, your sales force
when creating a product information CD, or potential customers when producing a
CD marketing piece. This lesson shows you how to create folders and bookmarks in
the Bookmarks View.
| If you . . . |
To do this lesson . . . |
| did Lessons 1-3 and have not closed the WebCDTutorial project |
go directly to number one (1) below. |
| did Lessons 1-3, but have closed the WebCDTutorial project |
open the WebCDTutorial.wcd project. |
| did not sequentially do Lessons 1-3 |
open the Lesson4.wcd project. |
To open a project that is not listed on the Startup dialog, double-click More Files.
Then open the appropriate directory and double-click the .wcd file to open the project.
If you are already in the WebCD Packager application, select Open Project from the File
menu. Note: The tutorial lessons projects are not available with demo
versions of the WebCD Packager.
 |
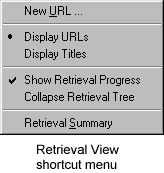
Right-click in an open space to the right of the URL list in
the Retrieval View to display
the Retrieval View shortcut menu. Click Display URLs to display
URLs (instead of titles) for all items in the Retrieval View. |

|
 |
Add a bookmark for the WebCD Tutorial Home Page. To do this, find
the default.htm document under the webcdtutorial folder
in the Retrieval View (see picture at right).
Using the mouse, drag default.htm from the
Retrieval View to the WebCD Bookmarks item in the Bookmarks View.
|
 |
 |
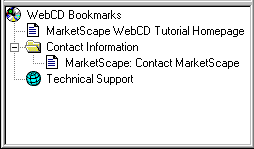
Add a folder called Contact Information to the Bookmarks View. To do this, right-click
on the WebCD Bookmarks item in the Bookmarks View. |
 |
 |
From the Bookmarks shortcut menu, click New and then Folder to display the
New Folder dialog box. Enter Contact Information as the Folder Name and click
OK. The new folder is added beneath the WebCD Tutorial Home Page Bookmark.
|

|
 |
Use the Browser View to browse to the Contacting MarketScape page: |
 |
(a) |
The starting URL you entered to create the WebCDTutorial
project automatically became your "WebCD Home Page". Browse to the
WebCD Home Page by choosing Home from the Navigate menu. |
Note The WebCD Home Page is the first page
users will see when they run your WebCD. You can set it to any HTML document.
|
 |
(b) |
Scroll to the bottom of this page and click on Contact MarketScape from
the selection line near the bottom of the page (the mouse pointer changes
to a hand or some type of indicator
when cursor is over the text, "Contact MarketScape"). |
 |
At this point the Contacting MarketScape page should be displayed in the
Browser View. Highlight the Contact Information folder you created
earlier in the Bookmarks View. |
 |
Now click the Add Bookmark button from the Browser View toolbar
to add the Contacting MarketScape page to the
Contact Information folder in the Bookmarks View. |

Add Bookmark button |
 |
Create a Live-LinkTM bookmark to the Technical Support page.
To do this,
drag the Support.htm file from the Retrieval View and drop it on the
WebCD Bookmarks item in the Bookmarks View. |
Note: A Live-Link automatically connects
the user back to your Web site. That is, when
the user double-clicks a Live-Link bookmark, if they have Internet connectivity, they
are connected to the requested page on the live Web site. |
 |
Right-click on the MarketScape: Support item in the Bookmarks View.
Select Rename from the shortcut menu. Type in Technical Support
followed by pressing ENTER to rename the bookmark. |
 |
 |
Now make this bookmark a Live-LinkTM by right-clicking on it again
and selecting Live-Link from the Bookmarks shortcut menu. |
 |
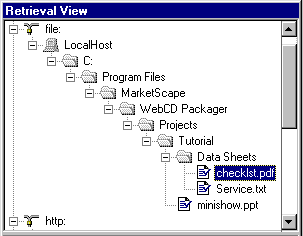
Find checklst.pdf in the Retrieval View. This document is inside the
Data Sheets
folder you dragged into the Retrieval View from Windows Explorer (Lesson 3).
To find this file in the Retrieval View, look under the file: protocol
(instead of the http: protocol we have been looking under up to this point).
Double-click the item or click on the plus sign (to the left of the item) to expand the
hierarchy to see the checklst.pdf file (see illustration).
|  |
 |
Besides highlighting "must see" topics, another reason to
add Bookmarks is to allow users to access any non-Web files you include on your WebCD.
Bookmarks allow you to avoid authoring new HTML pages to access the non-Web content.
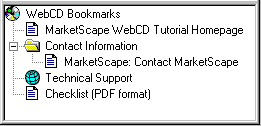
Drag checklst.pdf to the Bookmarks View and drop it on the WebCD Bookmarks item. |
 |
Right-click on checklst.pdf in the Bookmarks View.
Select Rename from the shortcut menu. Type in Checklist (PDF format)
followed by pressing ENTER to rename the bookmark. |
 |
 |
Note: You can rename ANY item in the Bookmarks View,
including the "WebCD Bookmarks" item. Another way to rename is to single click an
item to highlight it, and then click on it again. A box appears around the item. Type
in the new name and then press ENTER. |
 |
Often you may change your mind about the ordering of the bookmarks in the
Bookmarks View. One way to rearrange the bookmarks in the Bookmarks View
is using the cut and paste functions. Use the steps below to move the
Technical Support Live-Link above the Contact Information folder: |


Copyright 1996 MarketScape Inc., Colorado Springs, CO USA. All Rights Reserved.


